Landing page Design
What is a landing page design?
Landing page design is the process of creating an enticing site page for your target audience and website visitors. It should encourage them to convert from leads into subscribers or customers
How do you create a landing page?
we are here to learn the same thing.
Hey, In this article we will look at the steps of How to make a simple clothing website landing page with HTML, CSS and we will write our code in Visual Studio Code. We will start from the begging to end we will go ahead by thinking that your areee are Noob! :) So that we can explain you will "Don't follow the steps learn how to.
So first let's know What is Visual Studio Code
So visual studio code is a program or code writing software provided by Microsoft Compony and I think it is the best code writing software. Ahhh! it has a pro version also but I like the normal if you are pro then go for the pro version, I am Noob so I will go for normal free version. Basically I will suggest you to install Live server extension in visual studio code. This is the tutorial. So, let go ahead.
So at first let's know How to install Visual Studio Code in your Operating System
Installation
Step 1: Go to the Academic Software page of Microsoft Visual Studio Code and click on the button 'Download Visual Studio Code' to download the installer.
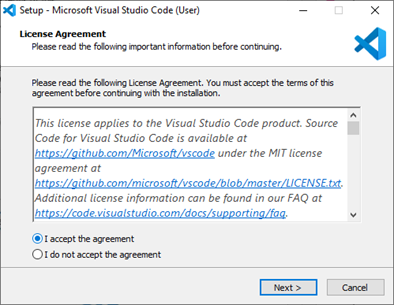
Step 2: Run the .exe installer from your downloads folder.
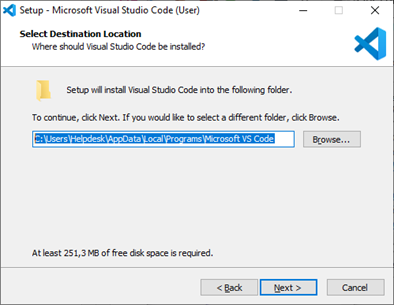
Step 3: Choose where you want to install the software. You can change the installation folder location, or keep the default settings. Click Next to continue.
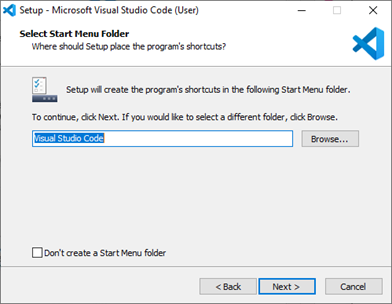
Step 4: Choose if you want to change the shortcut folder name in your Start menu, or don’t want to install shortcuts at all. Click Next.
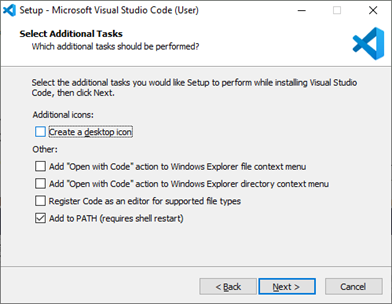
Step 5: Select the additional tasks, e.g. creating a desktop icon or adding options to the Windows Explorer right-click menu. Click Next
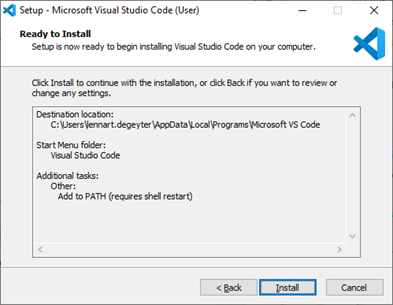
Step 6: Click Install to start the software installation.
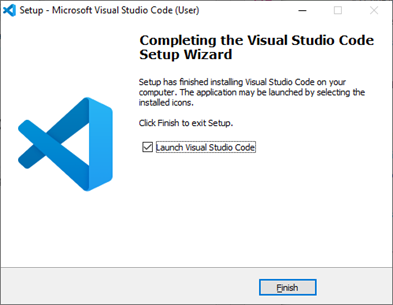
Step 7: The software is installed and ready to use. Click Finish to finalize the installation and start the program.
So, after installing the visual studio let start Making some folders So create a folder with name "Cloths shopping WEBSITE" or you can go for another name you like but you are a noob so go for it.
Open that folder with Visual Studio Code and make some new files with name index.html and style.css and one more folder with the name of "images".
So we are ready now to write our codes.
This is the basis html code.
<!DOCTYPE html>
<html lang="eng">
<head>
<title>Website Design</title>
<link />
</head>
<body>
</body>
</html>
Learn
The DOCTYPE is use to instruct the browser that what version of HTML is using in your code.
Title tag- is use to give a title on of the tab
Link tag- is use to like any type of other documents just like CSS, java etc.
Body tag- is the main tag in which you write your whole code
NOTE- We have to close the tag also by using / some tags does not required closing tags
Now you have to write this code
<!DOCTYPE html>
<html lang="eng">
<head>
<title>Website Design</title>
<link rel="stylesheet" href="style.css" />
</head>
<body>
<div class="container">
<div class="navbar">
<img src="images/logo.png" class="logo" />
<nav>
<ul>
<li><a href="">Home</a></li>
<li><a href="">About</a></li>
<li><a href="">Collections</a></li>
<li><a href="">Category</a></li>
</ul>
</nav>
<img src="images/cart.png" class="cart" />
</div>
<div class="content">
<a href="" class="btn">2020 Collections</a>
<h1>You should always<br />feel pretty</h1>
<p>Clothes that are sure to heat up your winter.</p>
<div class="arrow-icons">
<img src="images/back-arrow.png" />
<img src="images/next-arrow.png" />
</div>
</div>
<img src="images/img.png" class="feature-img" />
<div class="social-links">
<a href="">FACKEBOOK</a>
<a href="">INSTAGRAM</a>
<a href="">TWITTER</a>
</div>
</div>
</body>
</html>
Learn
Div- The div tag is used in HTML to make divisions of content in the web page like (text, images, header, footer, navigation bar, etc)
Li- The <li> HTML element is used to represent an item in a list.
Ul- The <ul> element is for grouping a collection of items that do not have a numerical ordering
Img- The <img> HTML element embeds an image into the document.
Href- (Hypertext REFerence) The HTML code used to create a link to another page
Nav- The <nav> HTML element represents a section of a page whose purpose is to provide navigation links,
src- The <src> Html elements is use to give the file location path the source.
If you want to learn more go on google or YouTube.
Now its time for some css
* {
margin: 0;
padding: 0;
}
.container {
height: 100vh;
width: 100%;
background-image: url(images/background.png);
background-position: center;
background-size: cover;
padding-left: 5%;
padding-right: 5%;
box-sizing: border-box;
position: relative;
}
.navbar {
width: 100%;
height: 15vh;
margin: auto;
display: flex;
align-items: center;
}
.logo {
width: 160px;
cursor: pointer;
}
nav {
flex: 1;
padding-left: 60px;
}
nav ul li {
display: inline-block;
list-style: none;
margin: 0px 20px;
}
nav ul li a {
text-decoration: none;
color: #333;
}
.content h1 {
font-size: 60px;
font-weight: 100;
margin-top: 24px;
margin-bottom: 15px;
color: #232d60;
}
.content p {
font-size: 20px;
color: #6a7199;
}
.content {
margin-left: 10%;
margin-top: 10%;
}
.content .btn {
display: inline-block;
background: linear-gradient(45deg, #87adfe, #ff77cd);
border-radius: 6px;
padding: 10px 20px;
box-sizing: border-box;
text-decoration: none;
color: #fff;
box-shadow: 3px 8px 22px rgba(98, 28, 68, 0.15);
}
.arrow-icons {
width: 40px;
margin-right: 25px;
}
.feature-img {
height: 90%;
position: absolute;
bottom: 0;
right: 160px;
}
.social-links {
transform: rotate(-90deg);
position: absolute;
left: -80px;
bottom: 180px;
}
.social-links a {
text-decoration: none;
counter-reset: #6a7199;
padding-right: 20px;
font-size: 14px;
}
bruh I don't know CSS(lie man nahi hai likane ka¯\_(ツ)_/¯) Go on google and search their bye or you can learn from YouTube.
F subscribe my blog for more post and let me know should I switch to WordPress? IN THE COMMENTS
INFO
You can download the img use in this project here
Password-dazzfinelolhai
you have to rename the folder from images dazzfineblogspotcom to images
So this was the end of this post meet you all in the next post before that don't forget to subscribe our Blog, so that you will get notified when ever we upload a awesome post. Thanks for reading bye. You can also follow me on Telegram and Youtube I post it pretty much every week, thank you so much and I will see you all in the next post bye.